[ECCUBE] ECCUBE4のプラグインを学ぶために商品レビュープラグインを改造して返信機能をつけてみる

ECCUBE4学習の3日目です
プラグインサンプルとして提供されている商品レビュープラグインを改造してみようと思います

githubからzipを落としてきて app/Plugin の下に置きます
2019年6月24日の段階では開発ドキュメントにProductReviewの名前で展開するように書かれていますが、実際はProductReview4とします
(そうしなければ次のインストールに失敗します)

$ cd ~/apps/ec-cube/app/Plugin
$ wget https://github.com/EC-CUBE/ProductReview-plugin/archive/4.0.zip
$ unzip 4.0.zip
$ mv ProductReview-plugin-4.0 ProductReview4
$ rm 4.0.zip

落としてきたProductReview4プラグインのインストール&有効化

$ cd ~/apps/ec-cube/
$ bin/console eccube:plugin:install --code=ProductReview4
$ bin/console eccube:plugin:enable --code=ProductReview4
ProductReview4プラグインのインストール完了

基本設定(プラグイン名やバージョン)は composer.json に書く、と。ここで追加のcomposerも書けるのかー
ふむふむふむ…

見てるだけでは頭に入らないので、改造することでもう少し理解を進めてみます
レビューにショップオーナーからの返信機能を付け加えてみます

データベースの定義は・・・
それらしいのは Entity/ProductReview.php しか見つからない。ここに見よう見まねで付け加えてみましょうか
apps/ec-cube/app/Plugin/ProductReview4/Entity/ProductReview.php の末尾に以下のように追加

/**
 * @var string
 *
 * @ORM\Column(name="reply", type="text", nullable=true)
 */
private $reply;

/**
 * Get reply.
 *
 * @return string
 */
public function getReply()
{
    return $this->reply;
}

/**
 * Set reply.
 *
 * @param string $reply
 *
 * @return ProductReview
 */
public function setReply($reply)
{
    $this->reply = $reply;

    return $this;
}

DBに反映されるのはインストール時だと思うので、一度無効化>アンインストールしてから、再度インストール>有効化してみます

$ bin/console eccube:plugin:disable --code=ProductReview4
$ bin/console eccube:plugin:uninstall --code=ProductReview4
$ bin/console eccube:plugin:install --code=ProductReview4
$ bin/console eccube:plugin:enable --code=ProductReview4

mysqlにログインしてテーブル構造確認( show columns from plg_product_review )すると・・・
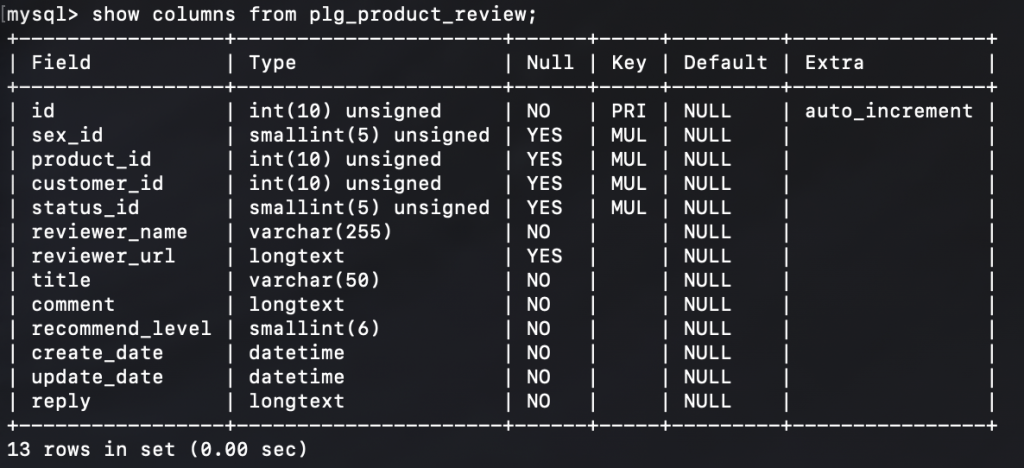
おお、ちゃんとカラムができてる!
このあともう少し調べてみたら、なにも再インストールをしなくとも
bin/console eccube:plugin:schema-update ProductReview4
だけでDB再定義できることもわかりました

では、お店からの返信を入力できるように管理画面用のFormとtwigを改造します

app/Plugin/ProductReview4/Form/Type/Admin/ProductReviewType.php
こちらのcommentの定義の後ろに追加

~~前略~~
            ->add('comment', TextareaType::class, [
                'constraints' => [
                    new Assert\NotBlank(),
                    new Assert\Length(['max' => $config['eccube_ltext_len']]),
                ],
                'attr' => [
                    'maxlength' => $config['eccube_ltext_len'],
                ],
            ])
            ->add('reply', TextareaType::class, [
                'required' => false,
                'constraints' => [
                    new Assert\Length(['max' => $config['eccube_ltext_len']]),
                ],
                'attr' => [
                    'maxlength' => $config['eccube_ltext_len'],
                ],
            ])
            ;

app/Plugin/ProductReview4/Resource/template/admin/edit.twig
こちらもコメントの後ろに追加

<div class="row mb-2">
    <div class="col-3">
        <span>{{ 'コメント'|trans }}</span>
        <span class="badge badge-primary ml-1">{{ 'product_review.common.required'|trans }}</span>
    </div>
    <div class="col">
        {{ form_widget(form.comment, {'attr': {'rows': '6'}}) }}
        {{ form_errors(form.comment) }}
    </div>
</div>

<div class="row mb-2">
    <div class="col-3">
        <span>{{ '返信'|trans }}</span>
    </div>
    <div class="col">
        {{ form_widget(form.reply, {'attr': {'rows': '6'}}) }}
        {{ form_errors(form.reply) }}
    </div>
</div>
管理画面でお店からの返信を入力できるかの確認

管理画面に返信欄を追加できました

フロント画面にも返信を反映させましょう
app/Plugin/ProductReview4/Resource/template/default/review.twig
前半のCSS部分と後半のHTML部分に追加

~~略~~

<style type="text/css">

    #product_review_area {
        border-top: 1px solid #E8E8E8;
        padding-bottom: 0;
        margin-bottom: 20px;
    }

    #product_review_area .ec-rectHeading {
        cursor: pointer;
        margin-top: 20px;
        margin-bottom: 20px;
    }

    #product_review_area .ec-rectHeading.is_active i {
        transform: rotate(180deg);
    }

    #product_review_area .review_list {
        padding-left: 25px;
    }

    #product_review_area .review_list li {
        margin-bottom: 16px;
    }

    #product_review_area .review_list .review_date {
        font-weight: bold;
    }

    #product_review_area .recommend_average {
        margin-left: 16px;
        color: #DE5D50;
    }

    #product_review_area .review_list .recommend_level {
        margin-left: 16px;
        color: #DE5D50;
    }

    #product_review_area .review_list .recommend_name {
        margin-left: 16px;
    }

    #product_review_area .review_list .review_reply {
        margin-left: 32px;
        margin-top: 12px;
        padding-left: 12px;
        color: #999;
        border-left: 2px solid #999;
    }

</style>

<script>
    $(function() {
        $('#product_review_area').appendTo($('div.ec-layoutRole__main, div.ec-layoutRole__mainWithColumn, div.ec-layoutRole__mainBetweenColumn'));

        $('#product_review_area .ec-rectHeading').on('click', function() {
            $content = $('#reviewContent');
            if ($content.css('display') == 'none') {
                $(this).addClass('is_active');
                $content.addClass('is_active');
                $content.slideDown(300);
            } else {
                $(this).removeClass('is_active');
                $content.removeClass('is_active');
                $content.slideUp(300);
            }
            return false;
        });
    });
</script>

<!--▼レビューエリア-->
<div id="product_review_area">
    <div class="ec-role">
        {% set positive_avg_star = ProductReviewAvg %}
        {% set nagative_avg_star = 5 - positive_avg_star %}

        <div class="ec-rectHeading is_active">
            <h4>{{ 'product_review.front.product_detail.title'|trans }}
                <!--平均の星の数-->
                <span class="recommend_average">{{ stars.stars(positive_avg_star, nagative_avg_star) }}</span>
                <!--レビュー数-->
                <span>({{ ProductReviewCount }})</span>
                <span class="chevron pull-right">
                    <i class="fas fa-angle-up fa-lg"></i>
                </span>
            </h4>
        </div>
        <div id="reviewContent">
            {% if ProductReviews %}
                <ul class="review_list">
                    {% for ProductReview in ProductReviews %}
                        <li>
                            <p class="review_date">
                                <!--投稿日-->
                                {{ ProductReview.create_date|date_day }}

                                <!--投稿者-->
                                <span class="recommend_name">
                                            {% if ProductReview.reviewer_url %}
                                                <a href="{{ ProductReview.reviewer_url }}"
                                                   target="_blank">{{ 'product_review.front.product_detail.name'|trans({ '%name%': ProductReview.reviewer_name }) }}</a>
                                            {% else %}
                                                {{ 'product_review.front.product_detail.name'|trans({ '%name%': ProductReview.reviewer_name }) }}
                                            {% endif %}
                                        </span>

                                <!--星の数-->
                                {% set positive_star = ProductReview.recommend_level %}
                                {% set nagative_star = 5 - positive_star %}
                                <span class="recommend_level">
                                            {{ stars.stars(positive_star, nagative_star) }}
                                        </span>
                            </p>

                            <!--タイトル-->
                            <strong>{{ ProductReview.title }}</strong>

                            <!--レビューコメント-->
                            <p>{{ ProductReview.comment|nl2br }}</p>

                            <!--レビュー返信-->
                            {% if ProductReview.reply %}
                            <div class="review_reply">
                                <span class="text-info">お店からの返信</span>
                                <p>{{ ProductReview.reply|nl2br }}</p>
                            </div>
                            {% endif %}
                        </li>
                    {% endfor %}
                </ul>
            {% else %}
                <p>{{ 'product_review.front.product_detail.no_review'|trans }}</p>
            {% endif %}
        </div>
        <div>
            <a href="{{ url('product_review_index', { id: Product.id }) }}"
               class="ec-inlineBtn--action">{{ 'product_review.front.product_detail.post_review'|trans }}</a>
        </div>
    </div>
</div>
<!-- ▲レビューエリア -->
商品詳細画面でレビューにお店から返信も追加

これでお店からの返信機能が出来上がりました!

ここまでの改造を反映させた返信機能付き商品レビュープラグインを公開しておきます
ProductReview-custom.zip

[ECCUBE] ECCUBE4をカスタマイズしてみる

昨日ECCUBE4のインストールはできたので、今日はカスタマイズの実践をしてみたいと思います
実際の案件でよくある、商品情報に項目を追加したい!をやってみます

Entityのカスタマイズ

ECCUBE3となにより違うのは、app/Customizeというディレクトリがあること
ECCUBE3ではカスタマイズ用のベースプラグインを作ったりしてたけどそれが要らなくなったんですね

開発ドキュメントをそのままなぞる形で商品情報にメーカー名を入れるカスタマイズをします。

app/Customize/Entity/ProductTrait.php

<?php

namespace Customize\Entity;

use Doctrine\ORM\Mapping as ORM;
use Eccube\Annotation\EntityExtension;

/**
  * @EntityExtension("Eccube\Entity\Product")
 */
trait ProductTrait
{
    /**
     * @ORM\Column(type="string", length=255, nullable=true)
     * @Eccube\Annotation\FormAppend(
     *     auto_render=false,
     *     type="\Symfony\Component\Form\Extension\Core\Type\TextType",
     *     options={
     *          "required": false,
     *          "label": "メーカー名"
     *     })
     */
    public $maker_name;
}

Entityを作ったらそこからProxyクラスを生成します
Proxy…ECCUBE3にはなかった用語ですね

$ bin/console eccube:generate:proxies
gen -> /opt/bitnami/apps/ec-cube/app/proxy/entity/Product.php

出来上がった app/proxy/entity/Product.php を見るとECCUBE3時代のEntityファイルのような内容
EC4のEntity ≒ EC3のdoctrine/*dcm.yml
EC4のProxy ≒ EC3のEntity
みたいな理解でいいのかな

Proxyができたらそれをデータベースに反映させます

$ bin/console doctrine:schema:update --dump-sql --force

テンプレートをカスタマイズ

さきほど作ったEntityに@Eccube\Annotation\FormAppendを記述したのでこれでもうフォームを使う準備は整っています
あとは管理画面の商品管理画面にメーカー名の項目を追加するよう、カスタマイズtwigを作成します

src/Eccube/Resource/template/admin/Product/product.twig
をそのまま以下にコピーして
app/template/admin/Product/product.twig

商品説明と販売価格(これはproduct_classがないときだけ出てくる項目)の間にメーカー名フォームを記述

 ~~ 前略 ~~

                    {{ form_widget(form.description_list, { attr : { rows : "4"} }) }}
                    {{ form_errors(form.description_list) }}
                </div>
            </div>
        </div>
    </div>
    
    {# maker_nameフォーム #}
    <div class="row">
        <div class="col-3">
            <div class="d-inline-block">
                <span>{{ form.maker_name.vars.label|trans }}</span>
            </div>
        </div>
        <div class="col mb-2">
            {{ form_widget(form.maker_name) }}
            {{ form_errors(form.maker_name) }}
        </div>
    </div>
    
    {% if has_class == false %}
        <div class="row">
            <div class="col-3">
                <div class="d-inline-block">
                    <span>{{ 'admin.product.sale_price'|trans }}</span>
                    
~~ 後略 ~~

以上で商品情報にメーカー名が追加できました!

[ECCUBE] GCPでECCUBE4事始め

ECCUBE4が正式リリースされたのが2018年10月。今が2019年6月なのでもう半年以上経ちました
まだ実際の案件として話は出てきてないんだけど、そろそろどんなものなのか触っておこうかと思いました

開発ドキュメントをざっとみたところ3.0よりも随分カスタマイズしやすくなってる予感!

GCPでLAMP環境立ち上げ

昔の印象が強いのか、どうしてもECCUBEはMySQLはダメでPostgreSQL推奨な気がしてしまいます
4系がどうなってるのかわからないけども、とりあえずは昔の印象通りLAPP (Linux+Apache+PostgreSQL+PHP) で構築してみます

初出ではLAPPで環境作成していましたが、後ほどカスタマイズする際にdoctrine:schema:updateでエラーを吐くため、LAMP(PostgreSQLではなくMySQL)で環境をつくるように変更しました
昔と違って今のECCUBEはMySQLのほうがよく検証されているのかな

Marketplaceにちょうどいいものがありましたのでこれを採用
LAPP Certified by Bitnami
LAMP Certified by Bitnami

さっそくデプロイ

ECCUBE4のインストールと設定

環境ができあがったら早速SSHログインしてみます
これ、最初からcomposerまで入ってる!
ほんとに手間なくていいなあ
次のステップとして初期パスワードを変えろとか静的IPにしたらとか出てるけど、ECCUBEのお試しができたら捨てるつもりの環境なのでそれらは無視して進めます

なんとなくbitnamiの流儀に従って/opt/bitnami/appsにECCUBEをインストールします

$ sudo chmod 777 /opt/bitnami/apps
$ cd /opt/bitnami/apps
$ sudo composer self-update
$ composer create-project ec-cube/ec-cube ec-cube "4.0.x-dev" --keep-vcs

composerをログインユーザで進めるとcacheを作る権限がないよと警告が出ていますが今は気にしない
暫く待つとインストール完了します

続いてECCUBEの動作設定をします
bitnamiの標準ではMySQLのrootユーザのパスワードはサーバ管理者と同じになっているそうです
管理者パスワードはGCPでデプロイしたときに表示されてるやつですね
本番ならrootユーザで運用なんてしないけど、今回はお試しなので手っ取り早く別ユーザー作らずにrootでいきましょう
データベース名はわかりやすく”eccube”で
Databaseの項目以外はデフォルトのまま設定を進めます

$ cd ec-cube
$ bin/console eccube:install
Database Url [sqlite:///var/eccube.db]:
> mysql://root:<管理者パスワード>@localhost/eccube
Database Server version [auto]:
>
Mailer Url [null://localhost]:
>
Auth Magic [9Vst7fuQkJUTZo8o]:
>

!                                                                                                                      
! [CAUTION] Execute the installation process. All data is initialized.                                                 
!                                                                                                                      

Is it OK? (yes/no) [yes]:
>

開発ドキュメントで書き込み権限が必要と書かれているディレクトリ・ファイルのパーミッションを変更しておきます

$ sudo chmod 777 .
$ sudo chmod 777 app
$ sudo chmod 777 app/Plugin
$ sudo chmod 777 app/PluginData
$ sudo chmod 777 app/proxy
$ sudo chmod 777 app/template
$ sudo chmod 777 html
$ sudo chmod 777 var
$ sudo chmod 777 vendor
$ sudo chmod 666 composer.json
$ sudo chmod 666 composer.lock
$ sudo chmod 666 .env
$ sudo chmod 666 .htaccess

Apacheの設定

ECCUBEの準備もできたのであとはapache設定

$ sudo sed -i -e 's/\/opt\/bitnami\/apache2\/htdocs/\/opt\/bitnami\/apps\/ec-cube/g' /opt/bitnami/apache2/conf/bitnami/bitnami.conf
$ sudo apachectl restart

これで http://<GCPのIPアドレス> でサイトが表示されました!

管理画面は http://<GCPのIPアドレス>/admin ですね
ID: admin PW: password
仮運用とはいえこれは単純すぎるのでログイン後に変更しておかないと

ここまで、なにもないゼロからECCUBE立ち上げまであっという間。
良い世の中になったもんです。

ですが今回インストールが目的じゃないのです。
明日以降カスタマイズ方法を学んでみます。
ECCUBE4をカスタマイズしてみる