ECCUBE4学習の3日目です商品レビュープラグイン を改造してみようと思います
githubからzipを落としてきて app/Plugin の下に置きます開発ドキュメント にProductReviewの名前で展開するように書かれていますが、実際はProductReview4 とします
$ cd ~/apps/ec-cube/app/Plugin
$ wget https://github.com/EC-CUBE/ProductReview-plugin/archive/4.0.zip
$ unzip 4.0.zip
$ mv ProductReview-plugin-4.0 ProductReview4
$ rm 4.0.zip
落としてきたProductReview4プラグインのインストール&有効化
$ cd ~/apps/ec-cube/
$ bin/console eccube:plugin:install --code=ProductReview4
$ bin/console eccube:plugin:enable --code=ProductReview4
ProductReview4プラグインのインストール完了 基本設定(プラグイン名やバージョン)は composer.json に書く、と。ここで追加のcomposerも書けるのかー
見てるだけでは頭に入らないので、改造することでもう少し理解を進めてみます
データベースの定義は・・・apps/ec-cube/app/Plugin/ProductReview4/Entity/ProductReview.php の末尾に以下のように追加
/**
 * @var string
 *
 * @ORM\Column(name="reply", type="text", nullable=true)
 */
private $reply;

/**
 * Get reply.
 *
 * @return string
 */
public function getReply()
{
    return $this->reply;
}

/**
 * Set reply.
 *
 * @param string $reply
 *
 * @return ProductReview
 */
public function setReply($reply)
{
    $this->reply = $reply;

    return $this;
}
DBに反映されるのはインストール時だと思うので、一度無効化>アンインストールしてから、再度インストール>有効化してみます
$ bin/console eccube:plugin:disable --code=ProductReview4
$ bin/console eccube:plugin:uninstall --code=ProductReview4
$ bin/console eccube:plugin:install --code=ProductReview4
$ bin/console eccube:plugin:enable --code=ProductReview4
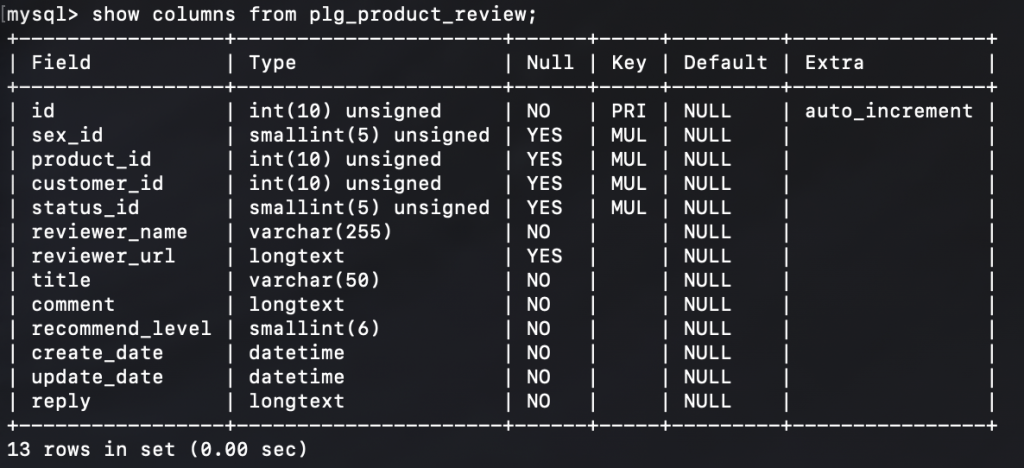
mysqlにログインしてテーブル構造確認( show columns from plg_product_review )すると・・・
おお、ちゃんとカラムができてる!bin/console eccube:plugin:schema-update ProductReview4
では、お店からの返信を入力できるように管理画面用のFormとtwigを改造します
app/Plugin/ProductReview4/Form/Type/Admin/ProductReviewType.php
~~前略~~
            ->add('comment', TextareaType::class, [
                'constraints' => [
                    new Assert\NotBlank(),
                    new Assert\Length(['max' => $config['eccube_ltext_len']]),
                ],
                'attr' => [
                    'maxlength' => $config['eccube_ltext_len'],
                ],
            ])
            ->add('reply', TextareaType::class, [
                'required' => false,
                'constraints' => [
                    new Assert\Length(['max' => $config['eccube_ltext_len']]),
                ],
                'attr' => [
                    'maxlength' => $config['eccube_ltext_len'],
                ],
            ])
            ;
app/Plugin/ProductReview4/Resource/template/admin/edit.twig
<div class="row mb-2">
    <div class="col-3">
        <span>{{ 'コメント'|trans }}</span>
        <span class="badge badge-primary ml-1">{{ 'product_review.common.required'|trans }}</span>
    </div>
    <div class="col">
        {{ form_widget(form.comment, {'attr': {'rows': '6'}}) }}
        {{ form_errors(form.comment) }}
    </div>
</div>

<div class="row mb-2">
    <div class="col-3">
        <span>{{ '返信'|trans }}</span>
    </div>
    <div class="col">
        {{ form_widget(form.reply, {'attr': {'rows': '6'}}) }}
        {{ form_errors(form.reply) }}
    </div>
</div>
管理画面でお店からの返信を入力できるかの確認 管理画面に返信欄を追加できました
フロント画面にも返信を反映させましょうapp/Plugin/ProductReview4/Resource/template/default/review.twig
~~略~~

<style type="text/css">

    #product_review_area {
        border-top: 1px solid #E8E8E8;
        padding-bottom: 0;
        margin-bottom: 20px;
    }

    #product_review_area .ec-rectHeading {
        cursor: pointer;
        margin-top: 20px;
        margin-bottom: 20px;
    }

    #product_review_area .ec-rectHeading.is_active i {
        transform: rotate(180deg);
    }

    #product_review_area .review_list {
        padding-left: 25px;
    }

    #product_review_area .review_list li {
        margin-bottom: 16px;
    }

    #product_review_area .review_list .review_date {
        font-weight: bold;
    }

    #product_review_area .recommend_average {
        margin-left: 16px;
        color: #DE5D50;
    }

    #product_review_area .review_list .recommend_level {
        margin-left: 16px;
        color: #DE5D50;
    }

    #product_review_area .review_list .recommend_name {
        margin-left: 16px;
    }

    #product_review_area .review_list .review_reply {
        margin-left: 32px;
        margin-top: 12px;
        padding-left: 12px;
        color: #999;
        border-left: 2px solid #999;
    }

</style>

<script>
    $(function() {
        $('#product_review_area').appendTo($('div.ec-layoutRole__main, div.ec-layoutRole__mainWithColumn, div.ec-layoutRole__mainBetweenColumn'));

        $('#product_review_area .ec-rectHeading').on('click', function() {
            $content = $('#reviewContent');
            if ($content.css('display') == 'none') {
                $(this).addClass('is_active');
                $content.addClass('is_active');
                $content.slideDown(300);
            } else {
                $(this).removeClass('is_active');
                $content.removeClass('is_active');
                $content.slideUp(300);
            }
            return false;
        });
    });
</script>

<!--▼レビューエリア-->
<div id="product_review_area">
    <div class="ec-role">
        {% set positive_avg_star = ProductReviewAvg %}
        {% set nagative_avg_star = 5 - positive_avg_star %}

        <div class="ec-rectHeading is_active">
            <h4>{{ 'product_review.front.product_detail.title'|trans }}
                <!--平均の星の数-->
                <span class="recommend_average">{{ stars.stars(positive_avg_star, nagative_avg_star) }}</span>
                <!--レビュー数-->
                <span>({{ ProductReviewCount }})</span>
                <span class="chevron pull-right">
                    <i class="fas fa-angle-up fa-lg"></i>
                </span>
            </h4>
        </div>
        <div id="reviewContent">
            {% if ProductReviews %}
                <ul class="review_list">
                    {% for ProductReview in ProductReviews %}
                        <li>
                            <p class="review_date">
                                <!--投稿日-->
                                {{ ProductReview.create_date|date_day }}

                                <!--投稿者-->
                                <span class="recommend_name">
                                            {% if ProductReview.reviewer_url %}
                                                <a href="{{ ProductReview.reviewer_url }}"
                                                   target="_blank">{{ 'product_review.front.product_detail.name'|trans({ '%name%': ProductReview.reviewer_name }) }}</a>
                                            {% else %}
                                                {{ 'product_review.front.product_detail.name'|trans({ '%name%': ProductReview.reviewer_name }) }}
                                            {% endif %}
                                        </span>

                                <!--星の数-->
                                {% set positive_star = ProductReview.recommend_level %}
                                {% set nagative_star = 5 - positive_star %}
                                <span class="recommend_level">
                                            {{ stars.stars(positive_star, nagative_star) }}
                                        </span>
                            </p>

                            <!--タイトル-->
                            <strong>{{ ProductReview.title }}</strong>

                            <!--レビューコメント-->
                            <p>{{ ProductReview.comment|nl2br }}</p>

                            <!--レビュー返信-->
                            {% if ProductReview.reply %}
                            <div class="review_reply">
                                <span class="text-info">お店からの返信</span>
                                <p>{{ ProductReview.reply|nl2br }}</p>
                            </div>
                            {% endif %}
                        </li>
                    {% endfor %}
                </ul>
            {% else %}
                <p>{{ 'product_review.front.product_detail.no_review'|trans }}</p>
            {% endif %}
        </div>
        <div>
            <a href="{{ url('product_review_index', { id: Product.id }) }}"
               class="ec-inlineBtn--action">{{ 'product_review.front.product_detail.post_review'|trans }}</a>
        </div>
    </div>
</div>
<!-- ▲レビューエリア -->
商品詳細画面でレビューにお店から返信も追加 これでお店からの返信機能が出来上がりました!
ここまでの改造を反映させた返信機能付き商品レビュープラグインを公開しておきますProductReview-custom.zip


